There are many different types of lense available. While some lenses can be used for landscape photography others are better suited to portraits. Portrait photography requires that you consider the focal length. The ideal length is between 45mm and 85mm. This is a flattering range. On the other hand, long focal lengths are ideal for wildlife photography, where you need to get a close-up shot of wildlife.
Focal length
The focal length of your camera's lens is its size. A camera lens typically has a focal length of between 10mm to 500mm. However, specialty lenses can go beyond this range. Camera lenses are either fixed or zoomable. The zoom settings will indicate what focal lengths each lens supports. Fixed-length lenses can focus for different distances, while zoom lenses are designed for a single working distance.
Camera lenses with a fixed focal distance are better for low light situations. It will produce sharper images with more contrast. Likewise, a camera lens with a fixed focal length is often more suitable for landscape photography than one with a variable-length lens.
Aperture
The aperture on your camera lens controls how much light enters the camera, which in turn controls the depth of field. A large aperture can create a broad field of focus while a smaller aperture can produce a shallower field of focus. This controls the brightness and light reaching the sensor.
To change the aperture of your camera lens, you need to change its f-number. The f/number format usually displays the f-number. Increasing the f-number by one stop will result in one stop of light entering the camera. To keep the exposure constant, you will need to reduce the shutter speed by half.
Optical system
Four components make up an optical system for a camera lenses. The first lens, which has a concave surface and has a negative reflectivity, has the third and second lenses having positive refractive powers. These four components combine to create a single picture and are often called the Lens Group.
The first lens has a concave shape in one direction, and a convex shape in the other. This arrangement provides a wide visual field angle while maintaining a compact lens size. The second lens has an opposite dioptre.
Price
Camera lenses can be a costly investment. But if you know how you can find a good used lens at a low price, you will be able save money. Secondhand lenses are just as good as new ones and can be purchased from online marketplaces like Amazon or eBay.
The cost of a good camera lens can vary greatly, depending on its purpose. Special purposes are where the most expensive lenses are used. Special purpose lenses can cost as much as $180,000. There are cheaper options available that may cost as low as $120.
FAQ
Which Lenses Should I Use?
Beginners often ask, "What lens should I purchase?" The choice is difficult because of the many options.
You don't have to buy a brand new lens each time you purchase a new camera. Instead, you can add lenses later on.
These are just three options for lenses that you might consider.
-
Wide Angle Lens (14mm to 24mm): These lenses allow you to see more of your subject from a wider angle. You can zoom in to improve image quality.
-
Standard/Normal Zoom Lens (28mm-70mm): These lenses let you change the focal length while still maintaining excellent image quality.
-
Telephoto Zoom Lens (70mm - 200mm): These lenses are great for capturing distant subjects. These lenses let you focus on the subject even if they are small.
These lenses can be combined to create different effects. Combining lenses can create different effects. For example, a normal lens could be used to capture small details while a telephoto lens is used to capture faraway objects.
Do I Need A Tripod?
This is one those questions that everyone has to ask. The truth is that a tripod isn't always necessary, but it can come in handy.
It helps you keep your camera steady while taking pictures at slow shutter speeds. A tripod is a great option for landscapes and other stationary subjects.
However, a tripod can blurriness if you are photographing moving subjects, such as people or athletes. What are the best ways to determine which situations you need a tripod for?
A tripod is useful for any situation where you want to photograph fast action or stationary subjects. Examples include:
-
Sports
-
People
-
Landscapes
-
Close-ups
-
Macro shots
Do this test to see if you are unsure if you require a tripod. Take your camera and hold it still. Then, look through the scope. If you see blurred lines or movement, then you definitely need a tripod.
If you don’t see blurring, adding a tripod is unlikely to make any difference.
If you do decide on a tripod purchase, these are some things to remember.
-
Your tripod should have smooth legs. This will prevent unwanted vibrations from shaking your lens.
-
Make sure you choose a sturdy tripod. Some tripods can be made out of plastic but they are not very durable. Opt for a sturdy metal tripod.
-
Buy a remote release. This remote control lets you remotely control your camera. You can set it to fire the shutter once you press the button automatically.
-
Try to find a tripod with a head that rotates 360 degrees. This makes it much easier to position your cameras horizontally or vertically.
-
Be aware that tripods are not cheap. Expect to pay $100-200. However, you'll get a lot of value for your money.
-
Accessories like memory cards and filters should not be forgotten.
-
Check your local stores before buying online. Many retailers offer free shipping.
-
Check out customer reviews to learn what they think about a product.
-
Ask family members or friends to share similar products.
-
Forums and message boards are a great place to find out about customer experiences.
-
Search online for user reviews.
-
Amazon.com allows you to compare prices, and receive customer feedback.
-
Take a look at these photo galleries to see what other photographers do with tripods.
Is photography an artistic talent?
Photography isn't a talent, it's an art form that takes practice, training, as well as experience. It takes years to master any aspect.
You need to plan how you will make money in photography.
To do this, you need to understand what kind of clients you want to attract and find ways to reach them.
You need to know who they are and what they want. It is important to communicate clearly and convincingly with them in order to convince them to use your services.
This means that potential clients will require you to be well-organized.
To be ready to meet potential customers, you'll need to build a portfolio. This can be done digitally using software programs or printed onto paper.
After creating a portfolio you should look for opportunities to present it. This could be by approaching businesses directly, or even advertising online.
Statistics
- By March 2014, about 3 million were purchased monthly, about 30 percent of the peak sales total. (en.wikipedia.org)
- That's the easiest way to get blurry photos 100% of the time. (photographylife.com)
- While I cannot prove that all of those spots were not sensor dust, the photo was taken during a heavy snowstorm…so I guess that 99.8% of the spots are snowflakes. (bhphotovideo.com)
- The second easiest way to get blurry photos 100% of the time is to use a cheap filter on the front of your lens. (photographylife.com)
External Links
How To
How to photograph in low light conditions
Low-light photography refers to taking photos in dimly lit or dark environments. It requires special equipment. The main challenges are controlling exposure, white-balance, and sharpness. Low light photography can be divided into two categories: ambient and flash. Flash photography works best when there's enough light around. A flash is required if there isn’t enough light. You might need a flash if your subject is outside but indoors. Shooting at night in the moonlight hours is a good alternative to using a flash. You'll be able to capture beautiful colors and shadows this way. Another option is to capture at twilight. Twilight is the time when the sun has set and there's still daylight.
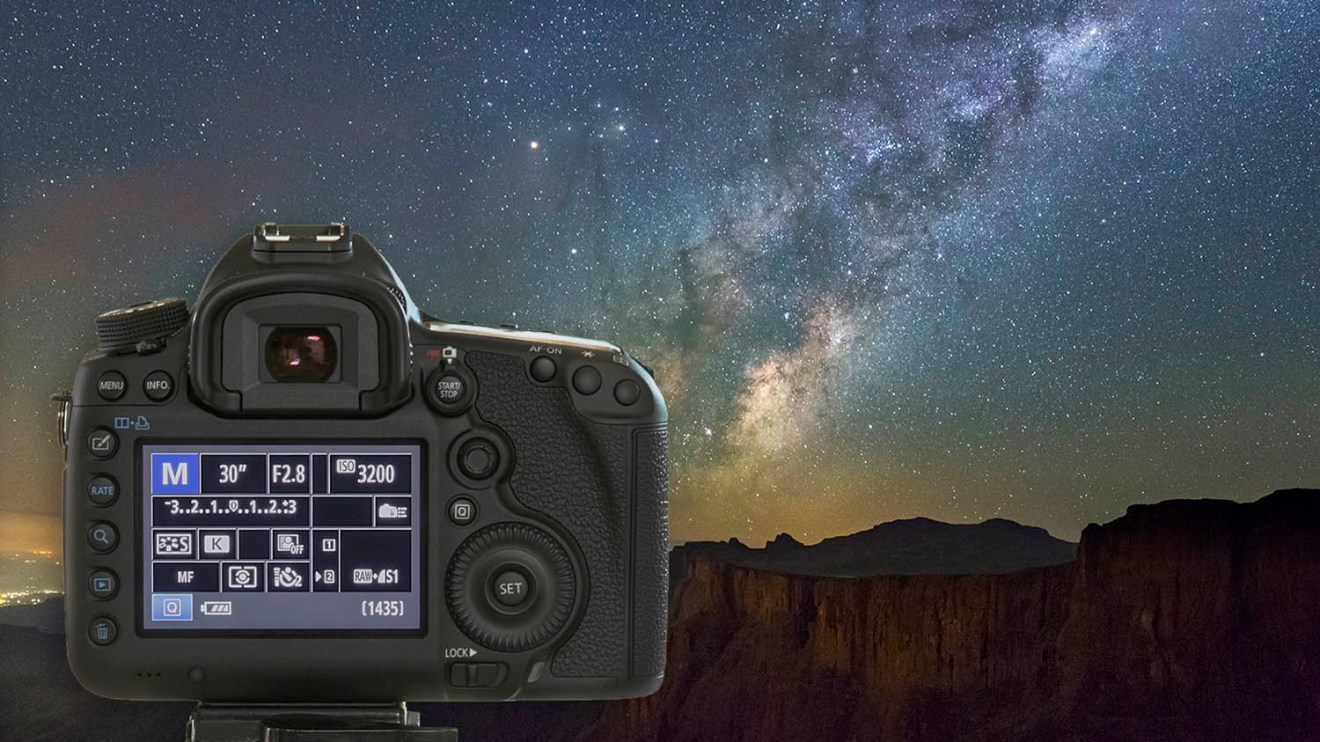
You might also be interested in long exposures. Long exposures enable you to take images even after your shutter has been open for several seconds. The shutter must be closed so that the camera only records light that hits the sensor. During a long exposure, this light continues to fall onto the photo sensor. The shutter is still closed so no light can enter the lens. The result is that there is very little movement. To ensure a clear image, you should turn off all automatic settings such autofocus or exposure. Before you begin shooting, adjust your ISO setting. An ISO setting of 200 will give you more control over the brightness or darkness of your image. The shutter button should be pressed quickly when you are ready to take the photo. This will cause the shutter to close completely. You should then hold down the shutter button for as long as possible. You can prevent any additional light entering your camera by holding the shutter button down. Wait a few seconds after you have taken the photo before you release the shutter button. This will allow the camera to process your image. While the image is processing, you can see your photos on your computer monitor. Save them once you are satisfied with them.